
Development of Front Crawl Stroke
Introduction
Here at Intelligent Triathlon Training, we believe that there are key aspects of a good front crawl stroke that all swimmers will need to work on to improve their stroke. They may not look the same for everyone, and there will be individual differences between swimmers.
The video below shows some of the key points that we believe you need to work on to improve your stroke. So if you don't know your catch from your alignment, then check it out.
The swimmer is an AG triathlete with a swim background. So her stroke is particular to her experiences and background as well as her morphology. She uses her kick effectively and has a high stroke rate, and you will be glad to know there are still some areas she can improve!
Process
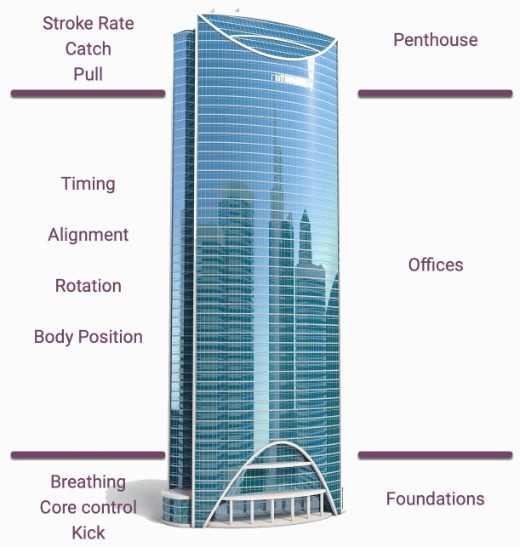
In most cases, you must build the foundations of a good stroke before working on the 'executive' aspects.
Much like a high-rise building needs solid foundations if it is to stay upright, you need solid foundation skills to be able to build more complex ones.
Then we have the core skills which enable you to position yourself effectively and reduce drag.
Finally, we have the executive skills, which are at the top - the penthouse if you like. These cannot be executed effectively if the foundations and core skills are not in place.
For any skill learning, there is a cycle: start at the bottom, work your way up through core skills, work on your executive skills, then return to revisit the foundations, improve them and so on. Each time you pass through a skill set, you aim to perform better. Thus your building can become taller, and the penthouse will have a better view!
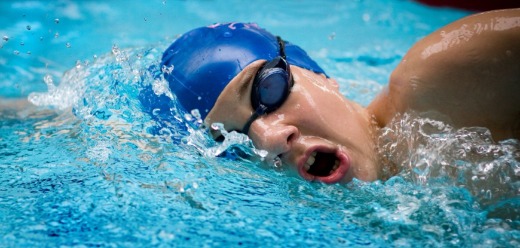
Breathing
You might think breathing is as natural as ........ breathing. However, as soon as we get in the water it seems that is not necessarily the case. One of the most common errors is breath-holding. Much like cycling or running or any exercise we want to have a regular inhalation and exhalation, with no significant pause at either end of the breath.
Holding your breath can cause a few issues for your stroke:-
- Lungs full of air are very buoyant, and this may cause your legs to sink and increase your drag
- Holding your breath causes a build-up of carbon dioxide which inhibits oxygen transfer, and therefore leaves you breathless much sooner than the effort applied should.
- If you are holding your breath, then when you turn your head to breathe you have to exhale and inhale very quickly, resulting in a negative impact upon your timing, which is likely to have an impact upon your catch and therefore propulsion.
Kick
Have you ever heard that triathletes shouldn't kick when swimming, to save their legs for the bike? In our opinion, this is not strictly true. It may be that you don't kick very hard, or even at all, but one thing you must do for an efficient stroke is to have control of your legs.
Why "control of your legs"?
If you take their kick away, some people lose rhythm and timing. So the aim of practising your kick is not necessarily to use it for propulsion, but can be more to allow you to maintain good position in the water and effective timing of movement.
Learning to kick and be in control of your legs may enable you to use them less. Key reasons for learning to kick effectively include:
- Improved body position, therefore reduced drag
- Improved stroke timing
- Potential to provide propulsion
Common errors with kicking include an action that mimics kicking a football, using the quads and a great deal of knee flexion. If you were to kick a ball with a correct swimming kick action, it would not go very far!
Body Position
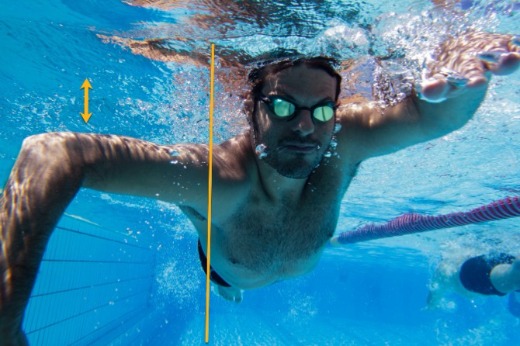
Body position is something that has one of the biggest impacts on drag, which requires significant effort or physical capabilities to overcome. There are two aspects to body position:-
- The level of the body from head to toes
- ideally, we want a flat position with a horizontal line drawn from the head through the hips and to the middle of the kick
- The depth in the water that the torso and legs sit.
- it is possible to have a flat position but be quite deep
The torso is quite flat here, but there is a bend at the hips that drops the feet.
There are a number of aspects that will influence body position in a variety of ways. We have mentioned breathing and kick and the factors involved in those. Another area that will impact body position is head position.
Having your head too low or too high will act as a counterbalance, and can tip the body position up or drop your feet.
Rotation
With rotation, we are referring mainly to the rotation of the torso throughout the stroke action. Most people will rotate at their shoulders as the lead hand enters the water, and at this point, we are generally looking for ~ 45 degrees +/- 5degrees. However, we also need to think about the rotation from the hips and where the rotation is initiated from.
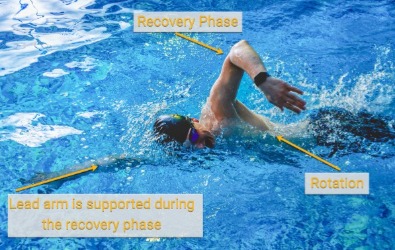
As the lead hand is entering the water the active arm under the water should be approaching your hips and in the push phase at the back of the stroke. At this point, we should see some rotation of the hips (~ 30 degrees).
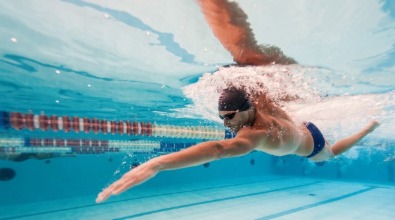
We can see the lead arm extended, shoulders open to ~45degrees and hips rotated. The body position is flat but quite deep in the water.
Initiating this rotation from your hips helps to make the rotation at your shoulders more comfortable and less of an extreme motion. For those who may struggle to open their shoulders that much anyway using your hips to help open up will make this more comfortable.
Rotation is important for a few reasons:
- It allows you to get into the best position to produce force with the arm in the water
- It makes inhaling much easier and means that body position is not affected, therefore maintaining a streamlined position. it reduces drag throughout the stroke by reducing the frontal area.
With rotation exercises, we focus upon the control of your rotation to make it a natural and smooth action.
Common errors in rotation include:
- Initiating the rotation from your shoulders, which often causes bending in the back, off the streamline position.
- Rotating more on one side than the other
- Over-rotation, often on the breathing stroke, in which case we need to look at the mechanics of breathing, head position and body position.

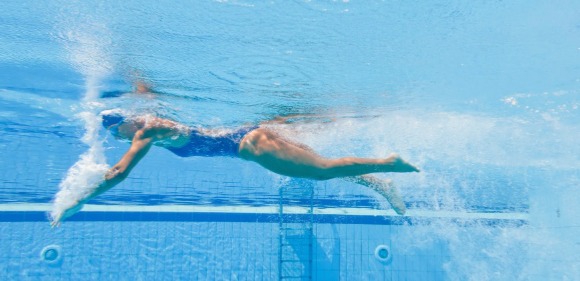
Over rotation with the hips and shoulders at almost 90 degrees. Body position is also poor, with the hips significantly below the surface of the water. Timing is also poor as the lead arm is already dropping before the recovering arm is into position.
Alignment
Alignment generally refers to:
- Hand position on entry to the water
- How the hand tracks through to the back of the push phase of the stroke
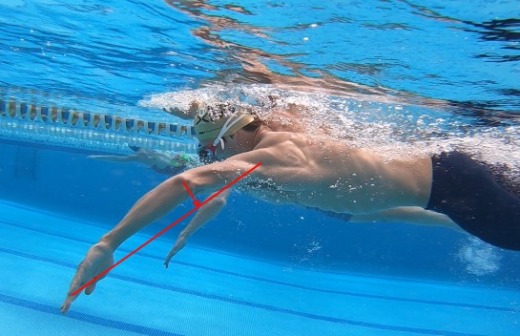
In the image to the right, we can see a straight line drawn between the feet, through the hips and head extending in front of the swimmer. Her hand is entering the water in line with her shoulder and to the outside of the line.
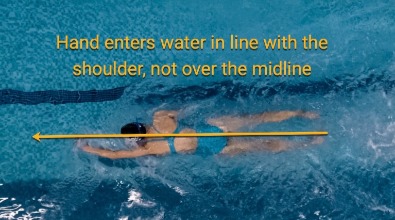
Crossing Over this midline is one of the major errors, sometimes it is a learnt skill (many swimmers were taught as children to enter with their hand in front of their head), that needs to be re-aligned. However a lot of the time this is a function of poor rotational control, poor timing of the stroke or poor control of the inhalation stroke.
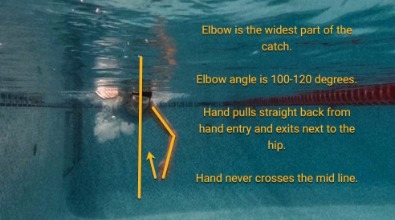
A second aspect of the alignment is how the hand tracks back under the water to the point of exit. We want the hand to remain on the same side of the midline at all times, and roughly to be underneath the body with the elbow the widest part of the stroke, as shown in the image to the right.
There are variations on this - not everyone will pull with the same alignment, some might be slightly wider, some slightly narrower, some might have a slightly straighter arm (not much though) and slightly more bent.
This should remain the same on the inhalation stroke, but this is often a key area where it goes wrong.
Timing
There are two main aspects to timing
- The timing of your left and right arm
- The timing of your kick to your arms.
We will spend the majority of the time looking at the timing of the arms as this is the most significant area for most people. The timing of the stroke also involves most of the aspects we have already covered though, which makes it complex and is why we deal with this later in the programme.
Timing of the arms
Without good control and coordination of your rotation, it's very difficult to have your body in the right place at the right time to get your timing correct. For instance, over-rotation will cause the alignment to be incorrect and therefore your potential to get the timing correct is reduced.
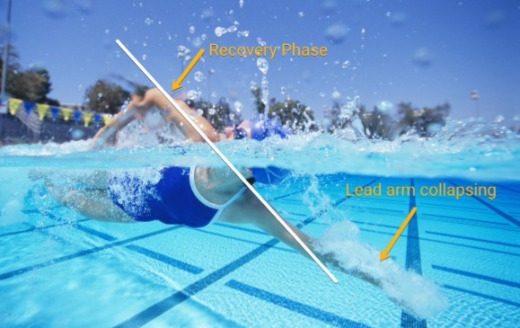
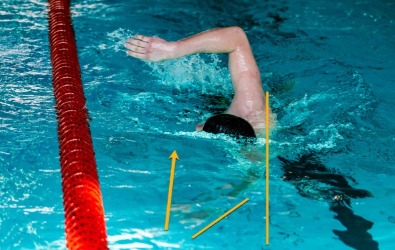
The image on the left shows the swimmer allowing the leading arm to drop (collapse) whilst the recovering arm is still exiting the water. The white line shows the arms are at approximately 180 degrees. Contrast this with the right-hand image, where the swimmer's lead arm is still high in the water and extended at the recovering arm is close to passing the swimmer's head.
One of the issues for the swimmer on the left is the over-rotation of her head, which forces the shoulder lower in the water and causes the lead arm to drop.
Correct timing will enable you to maximise the larger muscles of your chest and back, as well as your shoulders to pull more effectively, by having the potential to improve your catch. You cannot achieve an effective catch position if the timing is off.
One issue that often comes up for triathletes is that they are told to 'throw their arms over' to eliminate dead spots in their stroke. If your technique is poor this will work to an extent, however, it leaves you with only improving your fitness as a means of getting faster and is very energy inefficient. Learning the correct technique and then learning to speed this up, will ultimately yield much more potential.
Head Rotation (breathing)
We have discussed head position whilst not breathing, now let's have a look at what happens when you need to turn your head to breathe.
You might be asking 'why is this so far down the course'?
This is because a lot of the areas we have looked at will impact how you turn your head to breathe. If you body position is poor, or you over/under rotate then you will need to work on correcting those areas before you start to think about your head position and the act of moving your head to inhale.
In this image, we can see the swimmer has almost turned over to breathe, her face is completely clear of the water as are both goggles.
To do this requires the shoulders and torso to rotate a lot too, which places a lot of stress on the leading arm.
The time required to do this also places a limitation on the timing of the stroke, as it takes vital time to rotate this much and then return to neutral.
Contrast with this swimmer, and you can see that the face is approximately 90 degrees to the water with one goggle in the water.
This reduces the stress on the shoulder and allows a more effective catch position. It also means there is less movement of the head, which we can see here has barely moved on the swimmer's shoulders (i.e they have not rotated their head much at all, instead they have allowed it to follow the rotation of their shoulders).
Another aspect of moving the head to breathe is when does it start? Correct timing of the breathing action will also improve efficiency and minimise the time you are out of position.
Catch
The catch is the part of the stroke given most coverage in articles, videos and analysis on the web, and for good reason. This is what enables you to propel yourself. The catch really sets the stroke up, it's not the main propulsive phase.
Propulsion is achieved by pushing water backwards, if you push water down then you are creating lift, not propulsion and you are expending energy that does not provide optimal propulsion. To maximise your propulsion you need to maximise the surface area pushing water backwards, which means increasing the surface area of your hand and using your forearm and then maximising the amount of your stroke that you can achieve this for.
We refer to the Start of the Catch as the point when the hand enters the water and reaches the furthest forward position where the fingertips dip down.
This is the point where you set up the propulsive phase of the stroke. The catch finishes when the hand is a little in front of the head (see image).
A high elbow catch refers to having the elbow above a line drawn from the shoulder to the hand at the end of the catch as shown in the image to the right. This also relates to an Early Vertical Forearm (EVH).
A dropped elbow is when the elbow is below this line.
After this point in the stroke, we are moving into the pull phase.
Key errors in the catch phase include:
- Trying to catch too close to the surface of the water
- Trying to keep the elbow close to the surface of the water
- Alignment of the catch - a wide catch or a sweep under the body
- The angle at the elbow - too acute or too straight.
This is demonstrated in the image on the right.
A 'high elbow' catch where the swimmer has interpreted this to mean getting the elbow as high as possible. However, it is very wide and the pull will not engage the pectorals or lats effectively.
Pull
The pull phase of the stroke continues from the catch to the final few centimetres of the underwater part of the stroke. This is the main propulsive phase of the stroke. In order to maximise this phase rotation, timing and alignment need to be correct. If you are not in the correct position at this phase, you will not be able to engage all of your muscles effectively. The inhalation stroke is also an area that can cause the catch and pull to get out of alignmnet.
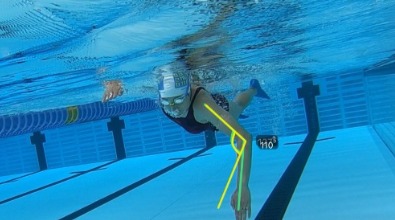
Ideally, we want the hand to catch and pull back underneath or very close to the body. This uses the larger muscles of your back and shoulders and ensures you are pressing water straight back and not at an angle. This position can be sometimes referred to as the "power diamond'.
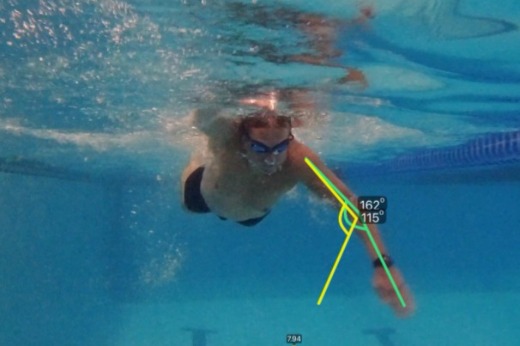
In the image to the right, we can see the swimmer has an elbow angle at ~127 degrees which is a little outside the normal range of 110-120 degrees. The yellow line denotes how much we would need to move the hand in to be in a better position.
This can be one of the hardest areas to get right and provides the most propulsion, however, you have to be in the right place to maximise this. Going straight to this area when the previously mentioned aspects are not in place will lead to a lot of frustration, and potentially injury.
Here we can see the lead arm has collapsed early, and the catch and pull have swept under the body and is providing very little propulsion. Timing is a major cause of this problem.
In this image, we can see the 'out sweep' catch where the hand is outside the elbow and a long way from being under the body.
Stroke Rate
Stroke rate is an important aspect of your stroke and allows you to speed up and slow down.
What is the best stroke rate?
There isn't a 'best' stroke rate, but there are bad stroke rates. Too low and there is a lot of dead time in the stroke where nothing is happening and you will be slowing down. Too high and you don't have control over your technique and effort will increase whilst speed decreases.
At most non-sprinting paces your stroke count for a length should remain fairly consistent, as you get faster your rate increases but the distance per stroke stays the same. If the count is starting to increase then your efficiency is starting to decline. Your effort will go up but your speed won't follow.
A robust stroke technique will give you the range to increase and decrease stroke rate, therefore giving you more control over your pace.
Summary
Thanks for reading to the end! We appreciate there is a lot to take in, but this is the process and key aspects of a swim stroke we will be working through on Swim Schools, Swim Clinics and the online Swim Course.
It never stops though, you can always be improving something somewhere in your stroke that will have a knock-on somewhere else.